Share If You Enjoy This!
Here's a handsome Colonial-style storage shed that's one of the most versatile, well-designed backyard buildings we've seen. In fact, it's really two sheds in one: a 10 x 12-ft. toolshed for general storage and an 8 x 10-ft. open-bay extension that's ideal for keeping firewood stacked and dry. The extension is also great for storing large items that might not easily fit into the main shed, such as lawnmowers, bicycles, patio furniture, wheelbarrows and stepladders.
We built our combination shed on a 4-in.-thick concrete slab, which makes an extremely durable and weatherproof floor. You could also construct a wood-frame floor using pressure-treated 2 x 6 lumber and a plywood deck, and support the assembly on solid concrete blocks or pressure-treated 6 x 6 skids. If you go with the slab, it's a good idea to hire an excavator and mason to have the job done right. Place anchor bolts in the concrete for securing the walls, taking care to avoid vertical frame locations and wall openings.
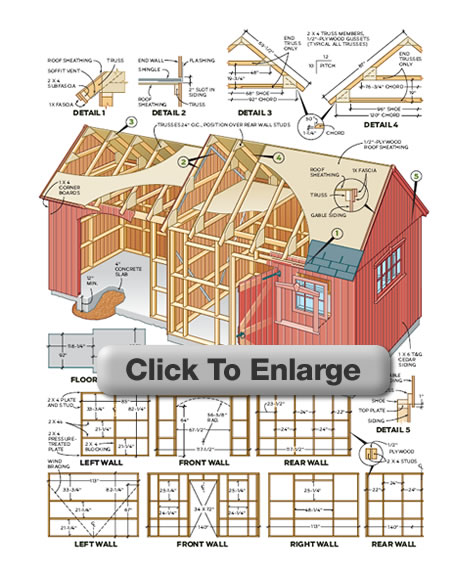
Click Here To Enlarge Drawing (PDF)We sheathed the structure with 1 x 6 tongue-and-groove cedar siding, which is naturally resistant to rot and insects. The roofs are covered with slate-gray, architectural-style asphalt shingles. Perforated-aluminum soffit vents installed along the eaves and continuous ridge vents at the peaks help exhaust hot air that can build up under the roofs during warm summer weather.
The main shed has three tilt-in barn-sash windows and a door that's made from the same tongue-and-groove 1 x 6 cedar used for the siding. You're not likely to find barn-sash windows at a home center, but they can be special-ordered at most lumberyards and farm-supply outlets.
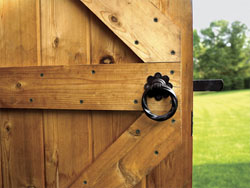
You can buy detailed plans for the combination shed for $29.95 from Better Barns (888-266-1960; www.betterbarns.com). Request plans No. 2023. The company also offers the traditional-style strap hinges and door latch we used.
START AT THE TOP
Before building the walls, make use of the open floor space as a platform for building the roof trusses. Each truss consists of two 2 x 4 rafters and a 2 x 4 chord that also acts as a ceiling joist. At the corners are plywood gussets secured with construction adhesive and roofing nails.Note that the gable trusses have collar ties (short horizontal members) so there's extra wood to which you can nail the siding. When you build the gable trusses, add flat 2 x 4 pieces, or shoes, to their bottom chords so the gables can be set slightly proud of the walls below them.
Both roofs have a 10-in. pitch--the slope rises 10 in. for each horizontal foot. This creates 50-degree angles at the rafter and chord ends. To cut these with a circular saw, use a template of the angle to mark each piece. If you're using a power miterbox, the angle graduations are complementary - you'll get a 90-degree cut when the tool is set at 0 degrees. So, set the tool at 40 degrees to end up with a 50-degree angle.
FRAME THE WALLS
Unlike a typical wall with vertical studs, the walls in this structure have long horizontal 2 x 4s that provide nailing support for the vertical siding. In place of the vertical studs are short 2 x 4s called blocking.Start by building the front and rear walls of the main shed. If you're building on a slab, use pressure-treated lumber for the bottom plates. Frame the front wall to accommodate the door and windows. The rear wall has no openings, leaving plenty of wall space for hanging tools and installing shelves.
Click here to get more shed plans »
With the wall frames flat on the floor, check that they're square by measuring the diagonals. We added diagonal metal wall bracing to the main shed's walls to increase frame stiffness. Attach the tongue-and-groove cedar siding to the horizontal 2 x 4s with 2-1/2-in. ring-shank siding nails. If you're on a slab, bore holes in the bottom wall plates corresponding to each anchor bolt. Tilt up the walls, set them over the bolts, and secure the walls with washers and nuts. Plumb the walls and temporarily brace them with 2 x 4s fastened to stakes driven into the ground. Frame the two gable-end walls, raise them between the front and rear walls, and nail the corners together. Then, add the cedar siding. Build the extension in the same way, but use a full-length double 2 x 6 header to span the wide opening.
TRUSSES AND TRIM
Nail the gable trusses to the main shed first. Place the remaining trusses over the vertical blocking, secure them with screws, and install the plywood deck and shingles.At the extension, set a gable truss in place against the main shed wall and trace the rafter line on the siding. Cut a 2-in.-wide slot along this line. With the trusses and decking in place, shingle the roof while adding step flashing installed through the 2-in. slot and under the siding.
Complete the job by building the door out of cedar, and nailing on the window trim and corner boards.
Traditional hardware, barn-sash windows and solid cedar give this shed the look of timeworn elegance.
Share If You Enjoy This!
ENJOY THIS GUIDE?
Then Download More FREE Shed Plans Below:
Fill out the form below and you'll immediately receive a FREE storage shed plan with instructions & detailed blueprints worth $24.97. You're just one click away!
Size : 2400 x 3800 (8 x 12 ft)
Materials List And Stock Size Provided
Step By Step Building Instructions
Skid, Joint Outlay & Stud Placements
Full Blown Detailed Illustrations
Roof Plan & Rafter Details
How To Build Wall Frame
You're JUST ONE CLICK AWAY below
“ I Build MORE Sheds In Just 7 Days
Than Most People Do In 3 Whole Months! ”
My Shed Plans Elite
The Ultimate Shed Plans & Woodworking Guide
Now with hundreds of shed designs, plans, blueprints for the hobbyist and professional alike
Packed with new ideas for everything from small clock housings up to an entire stable
Over 12000 design projects and woodwork plans included for the avid woodworking fan.
Tons of great shed plans projects to complete over the holiday / weekend with your family
Materials lists provided so you'll know exactly what to buy. No more wasting money buying the wrong materials
Comprehensive "How-To" woodworking guide and course. ( worth $147 alone )
How-to information on home improvement, detailed plans and instructions for woodworking projects
All the planning done for you... so you never have to worry when you start building your first shed.
Ryan Henderson
MyShedPlans.com
MyShedPlans.com
Ryan Henderson
2521 Falmouth Rd
Osterville, MA 02655
United States
FAQs | Order Now | Contact Us | Affiliates | About
Looking To Purchase Full Shed Kits Instead?